
§ 01What a rotating bezel does
The bezel is the ring that surrounds the crystal. On most watches it simply frames the dial. On a dive watch it does real work: it is a single-function elapsed-time timer you operate by hand, with no battery, no pusher, and nothing to break.
That simplicity is the point. A diver needs to know how long they have been underwater — for no-decompression limits and air planning — and they need that information to survive a knock, a glove, and zero familiarity with the watch. A rotating bezel answers all three. The design has barely changed since the first purpose-built dive watches of the early 1950s, because there is very little left to improve.
§ 02Reading a dive bezel, step by step
Using the bezel takes one action and one glance. Here is the whole method.
- Set zero. At the moment you start — entering the water, starting a parking meter, steeping tea — rotate the bezel so its zero marker (usually a luminous pip or triangle) lines up with the minute hand.
- Let time pass. The minute hand keeps moving around the dial as it always does. You do nothing.
- Read the elapsed minutes. Look at where the minute hand now points on the bezel scale. That number is how many minutes have passed since you set zero.
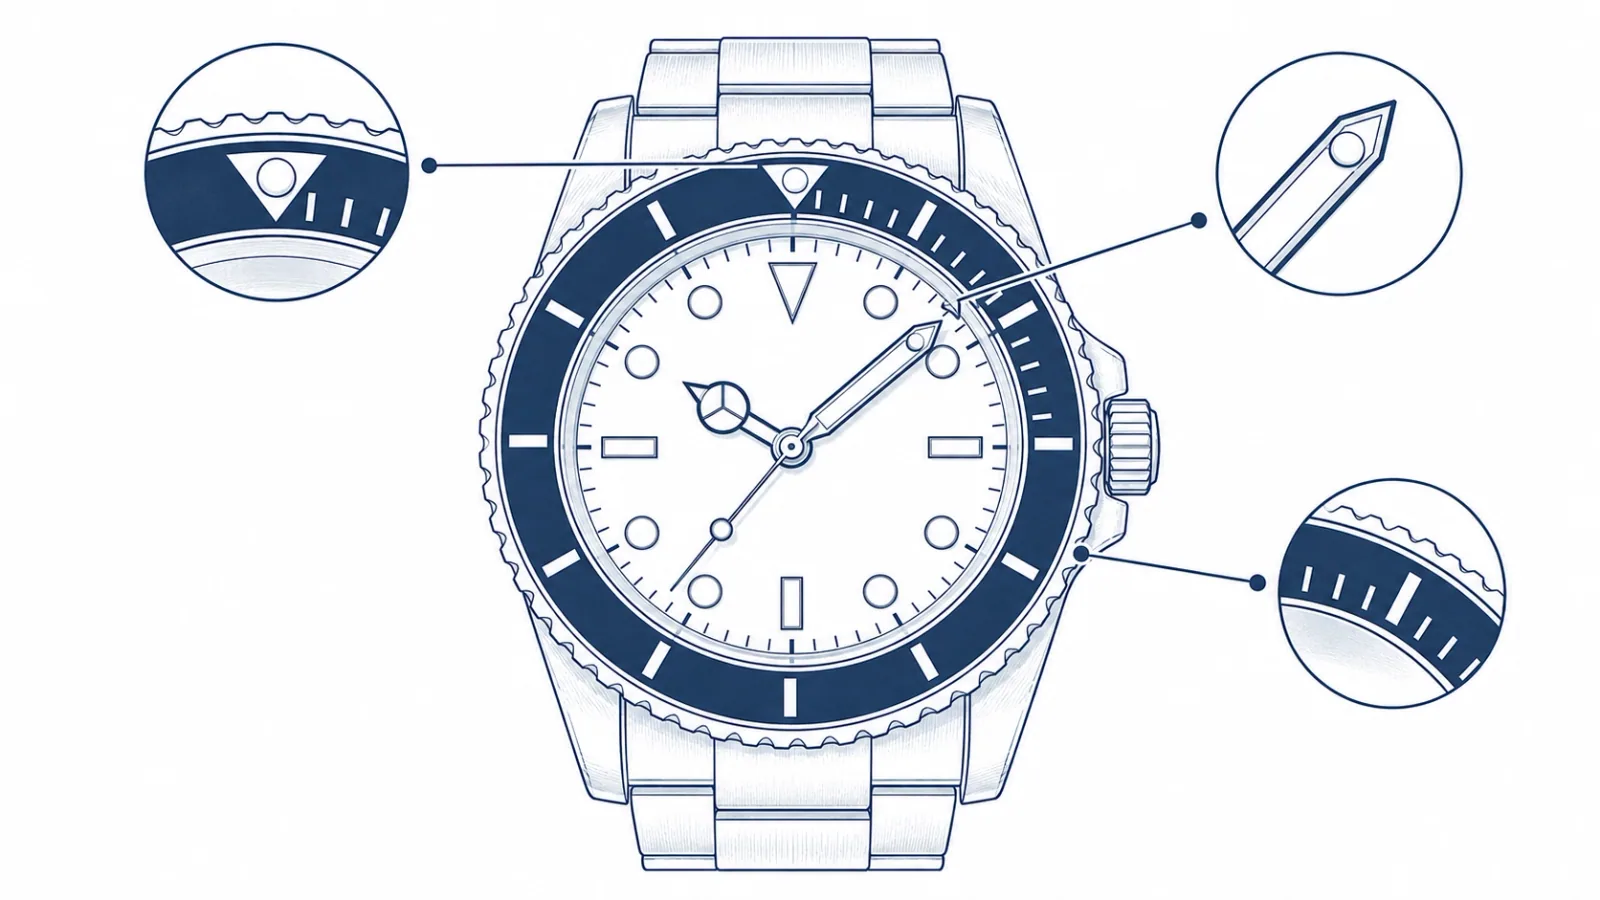
Because the bezel is marked 0–60 to match the minute track, the elapsed reading is direct — no mental arithmetic, no subtracting a start time. If the minute hand sits over the bezel’s “15” mark, fifteen minutes have passed.
A worked example
You gear-check and drop at 10:07. Before descending, you turn the bezel until the pip sits over the minute hand. Twenty minutes later you glance down: the minute hand points at the bezel’s 20. No memory of the start time, no arithmetic at depth, readable through a mask in one look. That is the entire system.
Using it as a countdown
The same bezel also works in reverse. Instead of putting the pip on the minute hand, set the pip where you want time to run out. If you have 40 minutes of parking, place the pip 40 minutes ahead of the current minute-hand position; when the hand reaches the pip, time is up. The first 15–20 minutes on most dive bezels are marked in single-minute graduations precisely so both methods stay accurate in the range where accuracy matters most.
Beyond diving
Most dive bezels never see the ocean, and that is fine — an elapsed-time bezel is genuinely useful on land. Steeping tea, parking meters, laundry cycles, billable hours, interval training, boarding times: anything under an hour, timed with one hand movement and zero apps. It is a large part of why the dive-watch layout became the default sports watch of the last seventy years.
§ 03Why it only turns one way
A dive bezel is unidirectional: it ratchets counter-clockwise and is locked against clockwise rotation. This is a deliberate safety feature, not a limitation.
Imagine the bezel could turn freely in both directions. A knock against a tank or a cave wall could rotate it backwards, making the elapsed time read shorter than reality — telling a diver they have more air and more no-deco time than they actually do. By allowing rotation in one direction only, any accidental movement can only push the zero marker further from the minute hand, which makes the elapsed reading longer. The error is always on the safe side.
What ISO 6425 requires
The unidirectional bezel is not just convention — it is written into ISO 6425, the international standard for divers’ watches (the standard that backs the word “Diver’s” on a dial). For the timing device, it requires:
- A means to pre-select a period of up to 60 minutes, protected against unintentional operation — in practice, a ratcheted unidirectional bezel or a locking mechanism.
- A scale with markings at least at every 5 minutes, clearly distinguishable from one another.
- Time readable in total darkness at 25 cm from the eye — which is why the zero pip and key markings carry luminous material.
ISO 6425 also demands 100 m minimum water resistance with over-pressure testing, plus magnetic and shock resistance — the bezel clause is one part of a whole system. A watch can use a dive-style bezel without being ISO-certified; certification requires the full test regime. On a custom build this is a cost decision we walk through with you — see what it costs to make an OEM watch for where testing sits in the budget.
§ 04Click counts and feel
Turn a dive bezel and you feel it move in discrete steps, or “clicks.” The click count is set by a ratchet spring under the bezel and it defines both the precision and the tactile quality of the action.
| Click count | Alignment step | Feel and cost |
|---|---|---|
| 60-click | 1 minute | Standard. One click per minute mark — precise and intuitive. |
| 120-click | 30 seconds | Finer, more premium feel. Costlier ratchet to tool. |
| 90-click | 40 seconds | Less common; a middle-ground mechanism. |
More clicks mean finer alignment and a more luxurious, higher-pitched action — and a more expensive ratchet spring and bezel underside to manufacture. For most custom builds a 120-click bezel is the sweet spot between feel and cost.
Inside the ratchet
Under the bezel sits a thin sprung washer — the click spring — with teeth or ball bearings that engage a serrated ring machined into the bezel’s underside or the case top. The geometry of those teeth sets the click count; the spring tension sets the effort; and the fit between bezel and case sets the back-play — the tiny free rotation you feel before the next click engages. A well-made bezel has firm, even clicks and lands its markers dead on the minute track.
What we check before a bezel ships
On our line, every rotating bezel passes three checks during final QC: the zero pip must align with 12 o’clock within half a minute-graduation; the action must click evenly through a full rotation with no gritty spots; and back-play must be imperceptible in normal handling. Misaligned or loose bezels are the most common cosmetic complaint on cheap dive watches — and they are entirely preventable at the fitting stage, which is why we test rather than assume.
§ 05The five bezel types
“Bezel” covers more than the dive timer. Most watches use one of five bezel families, each with a different function and a different manufacturing footprint.
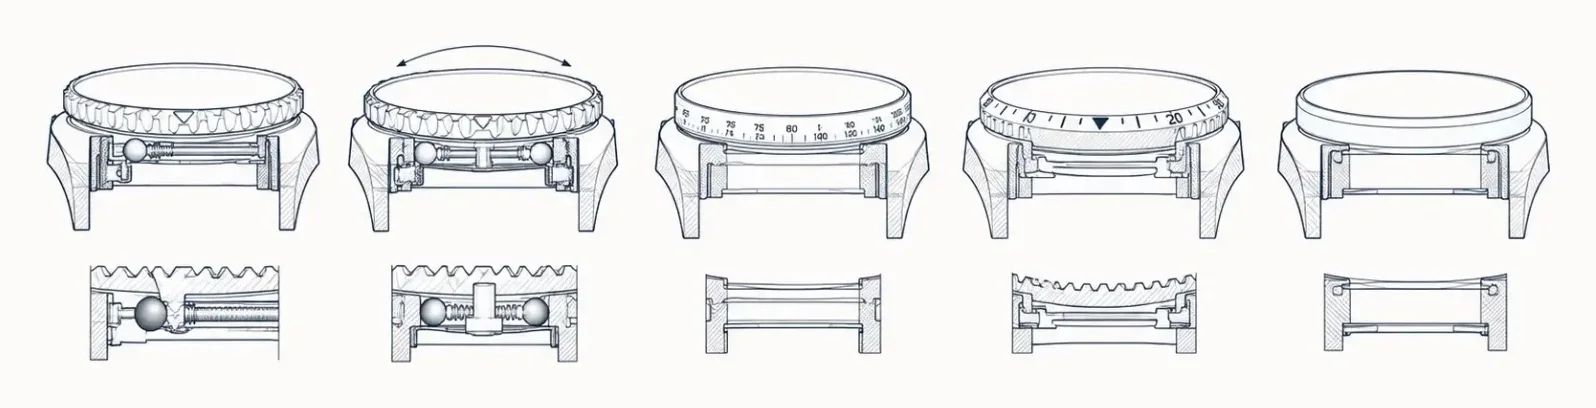
| Type | Function | Tooling |
|---|---|---|
| Dive (unidirectional) | Elapsed time | High |
| GMT (bidirectional) | 2nd timezone | High |
| Tachymeter (fixed) | Speed / rate | Medium |
| Count-up / count-down | Interval | Medium |
| Fixed / smooth | Frame only | Low |
Only the dive and GMT bezels rotate. A tachymeter bezel is fixed and printed with a speed scale; a count-up bezel is the same construction as a dive bezel but without the safety lock; a fixed bezel does nothing but hold the crystal — which makes it the cheapest and most water-resistant option.
GMT bezels in practice
A GMT bezel carries a 24-hour scale and pairs with a fourth hand that circles the dial once a day. Point the 24-hour hand at the bezel and you read a second timezone; rotate the bezel by the offset and you read a third. It turns both ways — over-rotation costs nothing here — and the two-color “day/night” halves are a tooling decision: two-tone anodized aluminum is economical, two-color ceramic is premium and priced accordingly.
How to read a tachymeter
A tachymeter converts time-over-distance into speed. Start the chronograph at a kilometer (or mile) marker and stop it at the next: the chronograph seconds hand points at your average speed on the bezel scale. Thirty seconds to cover the kilometer reads 120 — because 3,600 seconds in an hour ÷ 30 seconds = 120 km/h. The scale only works between roughly 7 and 60 seconds of elapsed time, which is why tachymeter markings start around “500” and end at “60”. If you are speccing a chronograph and weighing movement options, our Japanese vs Swiss movement comparison covers the meca-quartz and automatic choices.
§ 06Tooling a bezel for a custom build
When you specify a bezel for a custom watch, you are choosing four things: the insert material, the marker style, the click mechanism, and the finish.
| Fixed | Rotating | |
|---|---|---|
| Water resistance | Highest | Needs a sealing step |
| Tooling cost | Low | + ratchet, spring |
| Insert options | Steel, sapphire | Ceramic, aluminum, sapphire |
| Best for | Dress, field | Dive, GMT, sport |
Insert materials, ranked by cost
Aluminum is the entry point: light, easy to anodize in any color, and the vintage-correct choice — but it scuffs and fades with years of sun and salt. Ceramic (zirconia) is the modern standard for serious dive builds: scratch-proof in daily wear, its color fired in and permanent, its gloss unmistakably premium; the trade-offs are a higher per-unit cost and batch minimums, because ceramic inserts are fired in runs. Sapphire inserts — transparent, with lume or print beneath — sit at the top on both look and price. Solid steel bezels with engraved, lacquer-filled numerals skip the insert entirely and wear like a tank.
Markers and lume
Marker style shifts both look and cost: printed markers are economical; engraved-and-filled adds machining passes; applied luminous markers add material and hand-work. If the bezel must glow — and on a real dive bezel the zero pip must — specify the lume grade and color together with the dial so they charge and fade as one. We cover the options, from C3 to BGW9, on our custom luminous watches page.
We can match an existing reference or develop a bezel from your drawing. Rotating-bezel tooling — insert die, ratchet ring, click spring — is a one-time cost amortized across your run, quoted as its own line so you can judge it. Send a sketch through the dive watch manufacturing page and we will price the tooling and per-unit cost within 24 hours.
§ 07Care, problems, and fixes
A rotating bezel is the most exposed moving part on the watch. Three issues cover almost everything owners run into:
- Gritty or stiff action. Salt, sand, or dried sweat has worked under the bezel edge. Soak the watch head in warm fresh water, rotate the bezel through several full turns while submerged, rinse, and dry. After any seawater exposure this rinse should be routine — salt crystals are the main killer of click springs.
- Misaligned pip. If the pip no longer lands on 12 when the bezel is at zero, the bezel or insert has shifted on its seat. This is a bench fix — the bezel is levered off, the seat cleaned, and the insert re-set — not something to force by hand.
- Bezel stopped clicking. A fatigued or corroded click spring. The part costs very little; the labor is the removal and refit. On our builds the spring is stainless and sits behind a gasket, which is why the fresh-water rinse is usually all the maintenance a bezel ever needs.
One thing not to do: never twist a stuck bezel with pliers or tape-wrapped grips. The knurling that makes a bezel grippable with gloves also makes it easy to mar — and a scratched bezel edge is a case-refinish, not a quick polish.